Showing posts with label Punches. Show all posts

Monday, September 20, 2010

Carousel

Spring is here and there is warmth in the sun again. It makes you want to get out and about and be in nature. Instead though I opened up my craft room and let the sun shine in and the winter stuffiness go out and got creative.

All last week I have been looking for templates to make some things with my DSP. I love the colours in the new Elegant Soiree set. I am so glad Baja Breeze is included in the core colours now. It is one of my favourites.

Anyway back to the template hunting. I found a great website based in the UK called Card Carousel and bought a couple of their templates. I tried the carousel first and put a Stampin Up flair to it. Instead of using their template for the horses I decided to use the Two Step Bird Punch. By the way the new catalogue now has stick on pearls and they look great as the eyes.

I was originally going to use the horse from the Wanted stamp set but wanted to stick with items in the current catalogue. Also instead of attaching the birds to the pillar in the centre I used items from a set of embellishments that I have just realised are not in the new catalogue.

Anyways here are the pictures. It is a bit fiddly but the instructions that you get are easy to understand (well actually I really wouldn't know cause I don't read instructions but the template itself was enough to go off.) :)


I also did more creating but that is to come. I want to devote a blog post to each item.

Saturday, August 28, 2010

NC Day

This coming Wednesday is NC day - NEW CATALOGUE day. I have a feeling that with all the lovely new things in there that the Stampin' Up computer system may get overloaded with all the new orders. I feel for the staff in the warehouse packing them all up ready to post. They will be working overtime I think.

Below are a couple of notelets I was working on for a party I have coming up. I have used a couple of stamps that will still be available as well as the small square envelopes. What you see first is the envelope and then the notelet.

The stamp set is winter post and I have used soft suede ink to give a golden look to it. The snowflakes on the card itself I used the gold ink from the soon to be retired Catalogue. Not too the finish is gorgeous but it takes almost a good 48 hours to dry so if anyone has a trick they use to dry this quicker I would love to hear it.
The large oval is actually the smallest oval on the Big Shot oval die and the (just to confuse you a little) the smaller oval is the wide oval punch. :) You can't really tell but the reindeer is embossed in gold. My scanner does not do justice to colours.
I really had fun doing the one above. All the little speckled dots are using the Colour Spritzer tool. You put the brush end of one of the Stampin Up Markers into it and then squeeze and you get speckles of ink. The stamp set is Fun and Fast Notes. The tree is stuck on using dimensionals and the words I stuck to a scrap of chipboard to raise it up. I have also used the dazzling diamonds glitter on the tree and star but you can't really see it in this picture. The punches are the scallop circle and the scallop square and the post note stamp is from the Winter Post stamp set.

Hmmm well I think I might just go and play some more.

Have a great week.

Sunday, May 16, 2010

Experimental

I have been plucking up the courage to try and be a little more artistic and learn how to use the brayer to add colour to my card. Yesterday my friend came over and we decided to try it together. Below are my examples:

I used the glossy white hoping that the colour would "move" around better. For my first attempt using the brayer I am happy with how this one worked out. I was hoping it would be a little brighter but accidentally got a little brown on the yellow colour so had to blend it.

My friend has done scenic stamping and brought some of them along for me to try. The only things Stampin Up in this card are the sun, inks and the card. The sun almost turned into a near disaster and the words just refused to stamp cleanly in the middle (non stampin up stamp) but I am very glad with how it turned out.

These next two I followed instructions from a brayer expert. Not sure why but my black ink has decided that it wants to be purple. The tree is supposed to be black. I sponged black around the outside as well and had to use the stazon black and it certainly lives up to its promise of drying quickly and I found it tough going there for a while. This was done on whisper white paper and the sun seemed to disappear so in the second image I used white gloss paper. I also used stazon black for the tree but it looks like it has snow on it. I am still happy with them.

Finally some punchart. Enough of the dogs, here is a cat. No I didn't brayer the background but I did sponge it. I am soooooo happy with how it turned out. I masked off the moon and then added a touch of metalic silver ink to it. Hope you have enjoyed looking as much I have had experimenting.

Friday, May 14, 2010

Woofer Punching

This week has been one of those that seems to drag on and on. The good thing about it all is there seems to be extra time to have some crafty fun. I decided to do some more work on my punchart booklet. Yes I am a dog lover and yes I have started with just dogs. :) Different animals etc are on the cards for later.

Monday, May 3, 2010

Punches

Wow two blog posts in two days. This is becoming a habit! LOL

This last weekend gone I had a friend come over for a "play" day. She is so creative and I get so much inspiration from her. Somehow we both ended up doing punchart which is something neither of us have done in a long time. In fact the only real time I have done it was when called upon in a swap.
The card below started as an experiment. I used the Stampin up circle cutter but because the paper underneath was only held on one edge it buckled. You see I was doing what I typically do with a stanley knife and that is push hard. You don't need to do that with the circle cutter. I tried it again on a scrap and did it lightly, moving the blade around several times quickly and I got the perfect circle. If you choose to get this from Stampin Up I strongly recommend you get the glass cutter, this was the blade doesn't dig into a mat.
Back to the experimental card ... I am calling it the backwards card because really I made it backwards. The flowers stamped on the cardstock should have been done first but were done last and so on and so forth. Ok so what do you need to make this card:
  • Card Stock: Really Rust; Old Olive
  • Haiku Designer Series Paper
  • Punches: 5 Petal Punch; Word Window
  • Stamps: Teeny Tiny Sentiments; Playful Petals
  • Inks: Really Rust, Old Olive
  • Old Olive Ribbon
  • Clear button and hemp twine

The central flower is made by punching out numerous flowers with the 5 Petal Punch and then cutting down to the centre to create individual petals that I could place anywhere. From there it is just a matter of starting with the outer layer and then gluing each consecutive layer closer to the centre. I have also curved each petal around a pencil to give it more of a 3-D look.

This next card was my design but not necessarily my idea. In the punchart swap that I mentioned there was a card with a coffee cup on it. I just modified it to make some smaller coffee cups as well. To make these you need the following:
PUNCHES
Small Cup
- 1" circle
- small oval
Large Cup
- 1 1/4" circle
- small oval
- large oval
Other
- 1 1/4" square
STAMPS
- Priceless
- Pendant Park
CARD STOCK
- Really Rust
- Kraft
- Naturals Ivy
INK
- Really Rust
- Sahara Sand
Finally my favourite one. It came about because I wanted to create something slightly different with the Big Shot Dies. I folded the cardstock and then placed it on the die so that some of the fold would not get cut. I then decided to have a little more fun with my punches and see what I could come up with. The result was this owl. I think he is kinda cute. You will need:
PUNCHES
- 1 3/8" circle
- 3/4" circle
- 1/2" circle
- Scallop oval for wings
(only available in a recent mini but I am
hoping it comes out in next years
main catalogue)
- Scallop Circle (nose and feet)
- Extra Large 2 Step bird (branch)
- Medium Jewelry tag
DIES
- Scallop Circle
CARD STOCK
- Naturals Ivy
- Really Rust
- Kraft
- Old Olive
- Close to Cocoa
- Black
INKS
-Really Rust
- Close to Coca
- Sahara Sand
- Not Quite Navy
STAMPS
- Owl Together Now

Saturday, March 27, 2010

Let's Start Again

When I decided to create this blog I never knew what life was going to throw at me. Here I am, starting again and all going well I will have a bit of fun and you can get some ideas.

There is a new Autumn-winter mini Catalogue coming out in April for Stampin' Up. One of the beauties of being a demonstrator is that I can get supplies early and have a play. Two of the biggest things to happen is the addition of the Sizzix Big Shot for exclusive Stampin' Up embossing, and cutting. I am really excited about this because it cuts fabric and chipboard as well. My mind is racing as to what I can do with the fabric. I can't wait to see what the future holds for this product.

The second thing is the addition of clear mount rubber stamps. Not only are these easier to store but also cheaper. The pending catalogue has a gorgeous range of these. Below are some items that I have made using some of these new tools and stock


This is a small card that uses the following:
  • Big Shot Scallop Circle die
  • Very Vintage Jumbo Roller
  • Vintage Vogue Clear Stamp Set
  • Rich Razzelberry paper and ink
  • Soft Suede paper and ink
  • Melon Mambo Paper and ink
  • So Saffron paper and ink (standard stock)
  • Diamonte brad

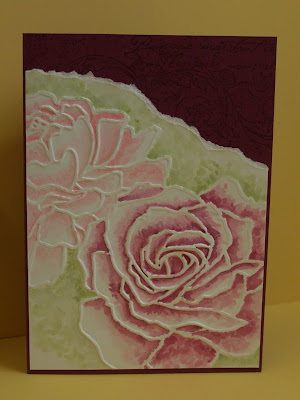
This regular sized card uses the following:
  • Manhattan Flower Textured Impression (used in the Big Shot)
  • Very Vintage Jumbo Roller (looovvvveeee this)
  • Rich Razzelberry paper and ink
  • Certainly Celery ink
  • Pretty in Pink ink.

I coloured in between the embossed petals using my water colour brush pen and the ink pads. When the ink pads are closed, press the middle firmly and this will leave some ink on the lid of the container. Use your water colour brush pen to collect the ink and dab into areas where shading would show.


Finally this last creation provides a gorgeous way to package little gifts. To create it you need to use the following:
  • Big Shot XL Fancy Favour (the box)
  • Main Catalogue In Colours Tempting Tangerine patterned paper and Kiwi Kiss Card stock and ribbon.
  • Teeny Tiny Sentiments clear stamp set
  • The gorgeous XL Two Step Bird punch
  • Word Window Punch
  • Round Tab Punch

If you live in the Perth area of Western Australia and interested in hosting a party or just purchasing some stock please email me (email in my profile). Going back to have some more fun now.